In our hyper-connected world, email is an essential tool for maintaining seamless communication. However, it can make it challenging to maintain a healthy work-life balance. We don’t want to deal with a constant barrage of emails during our downtime. Today, I’ll reveal how to set out-of-office in Gmail (now called “Vacation Responder” in the Gmail settings), so that you can unplug and decompress without worrying about things unraveling at work.
Whether you are stepping away for a long-deserved vacation or just need a few uninterrupted hours, Gmail’s Out of Office (OOF) feature can be your savior.
You can use this nifty tool as your personal assistant. It lets people know that you’re temporarily unavailable.
You get to set a custom message that will inform your contacts about your absence, and when you’ll be available again.

The brilliance of the OOF feature lies in its automation. Once activated, it ensures no email goes unanswered, which is important for maintaining your professional image while letting you enjoy your time off in peace.
It’s like having an efficient secretary taking care of your digital correspondence while you’re away!
In this article, we’re taking a look at Gmail’s OOF feature, and how to enable it before you go on a vacation.
| SuiteGuides.com is reader supported. If you make a purchase after clicking a link, we may earn a commission at no additional cost to you. |
What is the Out of Office Feature in Gmail?
The OOF feature is exactly what you need when you’re unavailable to respond to emails in a timely manner.
Regardless of why you’re unavailable, you can set up a pre-determined message that will be automatically sent to anyone and everyone who sends you an email.
You can customize the message as you prefer and specify the details of your departure and when you’d be available next.
The Out of Office feature maintains your professional relationships efficiently while allowing you to take your much-needed vacation.

However, the OOF feature does have a few limitations. Gmail doesn’t discriminate when sending out OOF replies – all incoming emails will receive the automated response, including unwanted or irrelevant ones.
This can result in increased traffic for your inbox. In addition, Gmail will only function properly according to the time zone that you are currently located in, not the one you’re travelling to (considering you’re going in a different time zone).
You’ll need to remember to adjust your settings before traveling.
Let’s take a look at the steps to enable the OOF feature.
Step-by-Step Guide to Setting Out of Office in Gmail
Here are the steps you need to take to set up an out of office notification in Gmail:
Step 1: Finding Your Way to the Gmail Settings Menu
When you’re starting out on setting up your OOF auto-responder, the first milestone is the Gmail settings menu.
Here is what you need to know, step-by-step.
- Launch your preferred web browser and navigate to your Gmail account to get things started.
- After logging in, your Gmail inbox will appear. (Ignore this step if you’re already logged in)
- Next, look for a small icon in the upper right corner of the page that looks like a gear (or like the common icon for Settings)
- By clicking this icon, you will be directed to a dropdown menu with a list of Gmail’s features and configurations.
- Here, look through the options for “See All Settings,” and click on it. This click will take you to the central hub of Gmail’s operations – the ‘Settings’ page. This page offers a host of configuration options for customizing your Gmail experience.

Step 2: Finding the Out-of-Office Settings
Now that you’ve successfully arrive on the All Settings page, it’s time to look at the Out of Office settings.
- Look for a horizontal array of tabs, each representing a different cluster of settings. Within these, select the “General” tab. This tab is typically chosen by default when you initially land on the ‘Settings’ page.
- Scroll down on the General tab until you discover the “Out-of-Office AutoReply” section. This was recently renamed the “Vacation responder” section:
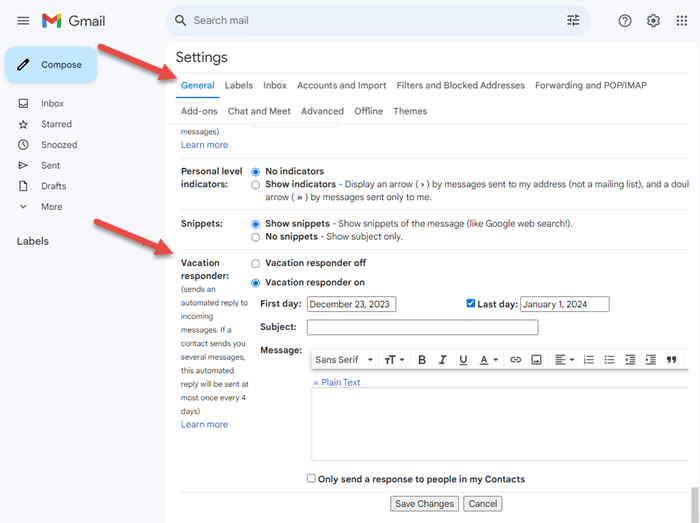
This is the command center for crafting a professional and courteous message for anyone who attempts to reach you during your absence.
Step 3: Turning On the Out-of-Office Feature
Once you have arrived at the “Out-of-Office AutoReply” section, it’s time to activate the Out of Office feature.
- To enable this feature, you will see two options: “Out of Office AutoReply off” and “Out of Office AutoReply on” (as mentioned, Gmail recently updated these fields to “Vacation responder off” and “Vacation responder on”). Choose the “on” option to enable the feature in your Gmail account.
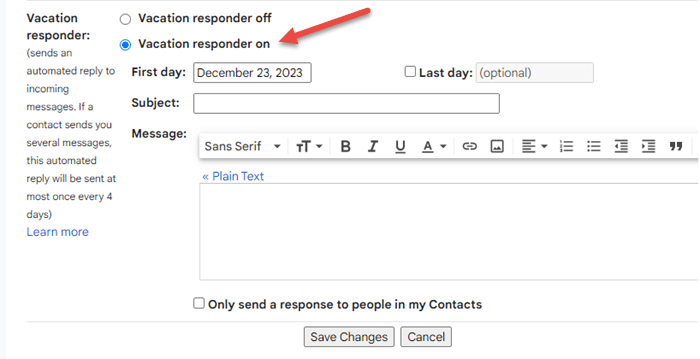
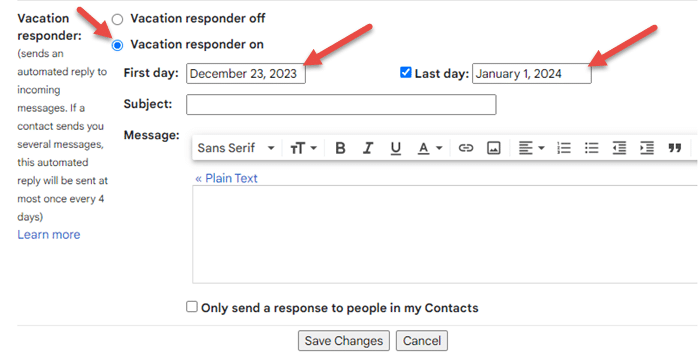
- Next you’ll choose to enter the “First day” and “Last day” (optional) of your absence and to compose your Out of Office / Vacation Responder message.
- First, define the “First day” field as the commencement date of your unavailability. This is the day when your Out of Office auto-responder springs into action, automatically dispatching your pre-set response to any incoming email. Be mindful to be accurate when selecting this date. It sets an expectation with your contacts about when you will be unavailable.
- Next, specify the “Last day” of your absence. This date denotes the termination of your auto-responder’s activity, after which it ceases to send out your OOF message. Adding this date ensures that your OOF auto-responder isn’t inaccurately responding when you’re back in the office. However, if you don’t add this detail, you can still always manually disable the OOF once you get back to work.
Step 4: Crafting the Out-of-Office Message
Once you’ve activated your Out of Office auto-responder and marked your dates of absence, you’re presented with an opportunity to write your OOF message.
This message serves as your digital representative, promptly responding to your emails during your absence. Make sure that it encapsulates all the necessary details in a clear and professional manner.
Typical out-of-office messages explain how long you’ll be away, provide a time frame in which senders may expect a reply, and list a replacement contact for any urgent issues.
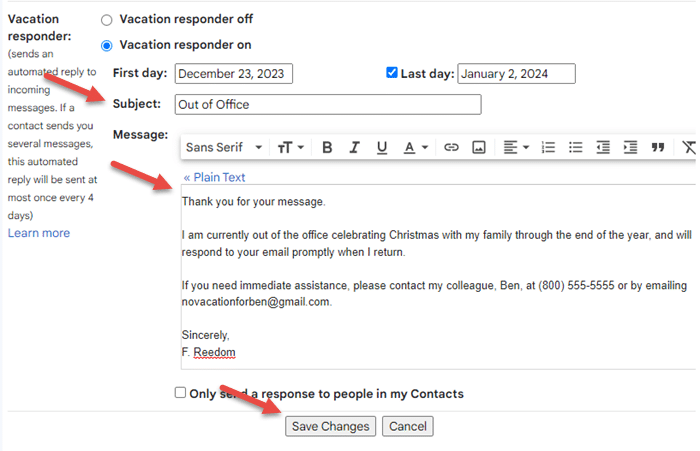
You can add a conclusion too, but the most important thing is to make sure that your message is comprehensive and clear.
Step 5: Configuring the Time Span for the Out-of-Office Message
The timing parameters for your Out of Office message are determined by the “First day” and “Last day” fields.
This time span signifies the active period of your auto-responder, during which it dispatches your pre-set Gmail vacation responder message to any incoming email.
This feature operates based on your current time zone as configured in Gmail.
If your absence involves traveling to a different time zone, consider this while setting your start and end dates to prevent any time-related confusion.
Step 6: Customizing the Recipients of Your Out-of-Office Replies
Finally, the last step in setting up your Out of Office auto-responder involves tailoring the recipient list for your automated responses.
By default, Gmail sends your vacation responder replies to every incoming email.
However, I recommend modifying this so that OOF replies are only sent to people currently in your contacts. This helps to prevent unnecessary email exchanges with unfamiliar senders or spam emails.

Once you’ve laid out all these details, click on the “Save Changes” button at the bottom of the page to apply your configurations.
Now, your OOF auto-responder is ready and equipped to manage your email communications efficiently during your absence.

Tips and Best Practices for Out-of-Office Messages
Here are some tips and best practices for creating perfect out-of-office messages in Gmail.

Be Clear and Concise
Your out-of-office message doesn’t have to be a novel. Stick to the essentials: you’re out, when you’ll be back, and whom to contact in your absence.
For example, you can write: “I’m currently out of the office and will be back on [date]. In case of an emergency, kindly contact [name of the person who’ll be handling the work in your absence] at [email address]. Otherwise, I will respond to your emails as soon as possible upon my return or as I get the chance.”
Keep It Professional
Don’t be too casual or use an unprofessional tone in your Gmail autoresponder.
Remember that this message represents your professionalism even when you can’t respond personally.

So, make sure you maintain a businesslike tone. Also, check for typos and grammatical issues – consider an app like Grammarly to help with this.
Indicate If You’re Checking Emails (Or Not)
If you’ll be checking your email occasionally, mention it.
But if you won’t be looking at your email at all, that’s worth noting too. It sets clear expectations and people will appreciate the heads-up.
Direct Them to the Right Place
If there are other people or resources that can assist the sender in your absence, include that information.

Provide contact details for your stand-in or links to help documentation or FAQs, for example.
Use the Subject Line Wisely
Gmail also allows you to set a subject for your out-of-office response.
Make sure it’s clear and informative, like “Out of Office: [Your Name].” This will help the recipient identify the automatic response at a glance.
Final Thoughts: How To Set Out of Office in Gmail
As I’ve shown here, setting up your Out-of-Office reply in Gmail is much easier than you think. It ensures that people who email you when you’re away get a professional response.
Now that I’ve outlined these detailed steps, you’re equipped to manage your email communications efficiently during your time away.
By using the OOF feature, you get peace of mind and feel free to take a much-deserved break. You won’t have to worry about unattended emails.


